# The Tutorial
This is the part you came here to see. From here on this guide will take the form of a step-by-step tutorial.
These major steps are covered:
- Preparing the
template.blendfile - Using the
template.blendfile - Create some camera paths
- Animate the camera
- Animate the camera target
- Export the paths to a Camera2 movement script
- Configure the Camera2 plugin
- Test the paths in Beat Saber
# B2C2 v1.0 vs v1.1 (or newer)
TIP
Tutorial steps are slightly different between B2C2 versions.
- The template included in B2C2 v1.0 is set to a frame rate of 120 frames per second.
- The template included in B2C2 v1.1 (or newer) is set to a frame rate of 60 frames per second.
I make note of the differences throughout the tutorial. Be sure to do the right thing for your version of B2C2.
# Prepare the Template File
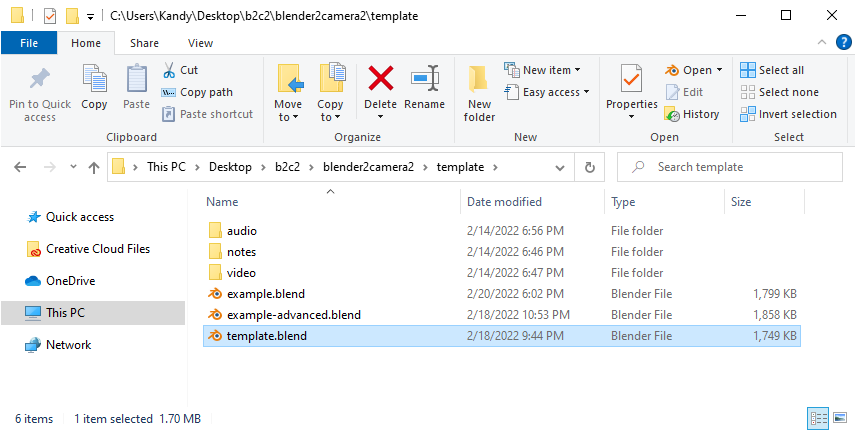
In the blender2camera2 download package, in the template folder, find the template.blend file and open it.
I configured this file so that it already includes:
- An object that represents the platform (where the player stands)
- An object that represents the highway (where the blocks come from and fly toward the player)
- An object that represents the player
- Audio playback, if you install the
song.wavfile in the right spot - Video textures, which will help you synchronize your custom camera movements to exact frames
First time users should use the included template.blend file.
# Install Audio
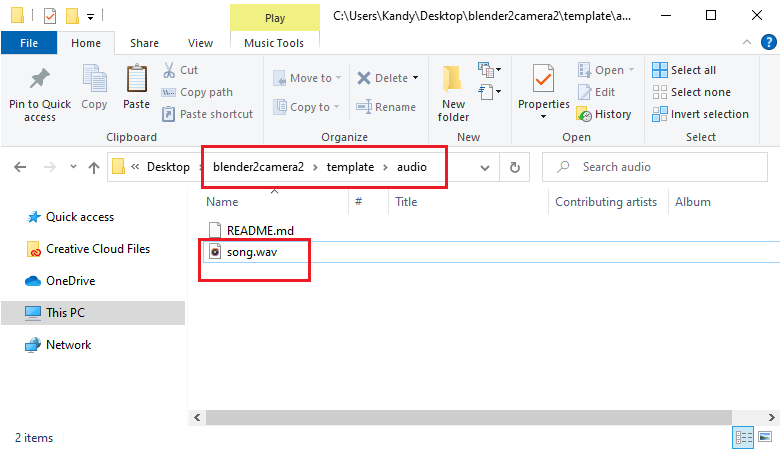
After extracting the map audio, place the song.wav file in the template/audio folder.
WARNING
The .wav file MUST be named song.wav.
# Install Reference Video Frames
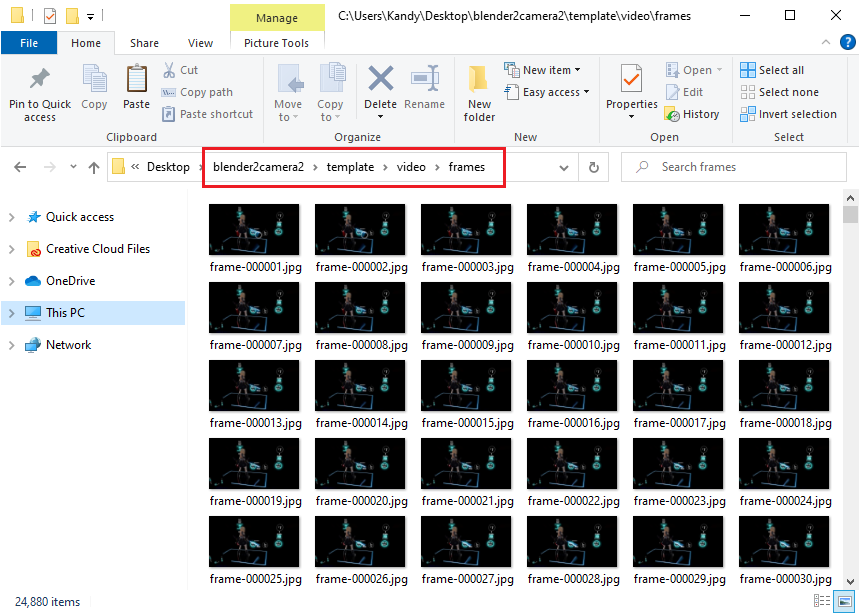
Place your extracted video frames in the template/video/frames folder.
# Copy the Template
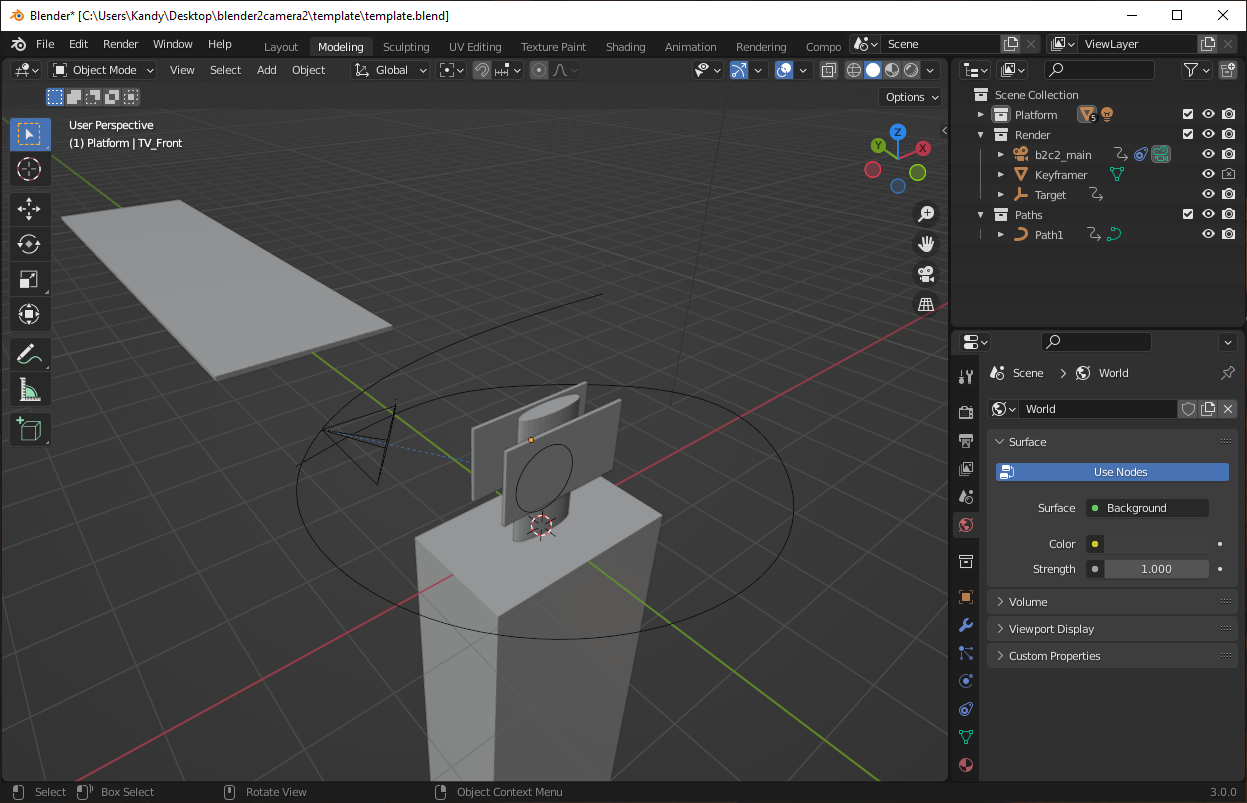
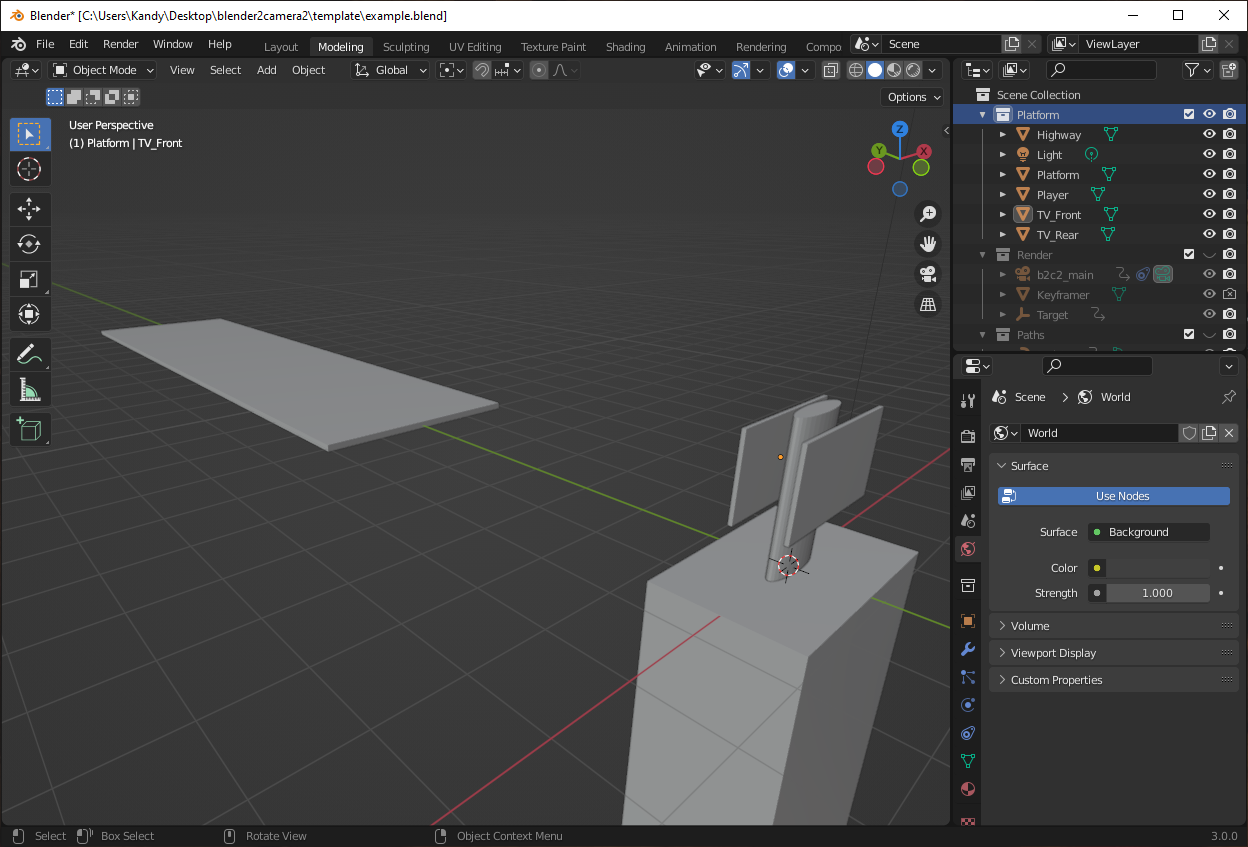
Use Blender to open the template.blend file.
Your Blender window should look like this:
Select File → Save As... and save the file under a different name. This is so you can preserve the template.blend file.
In this example I saved the file as example.blend.
TIP
If you accidentally save over the template.blend file then just extract the blender2camera2 download package again.
# Using the Template File
There are several objects in the template that you need to know about.
# Platform
The objects in this group represent the in-game Platform, Highway (where the blocks come from), and the Player model.
The Light object is for use in Blender only and has no effect on anything in the game.
TV_Front and TV_Rear can be configured to display frames from a reference video. I recommend using these objects so camera synchronization is much easier.
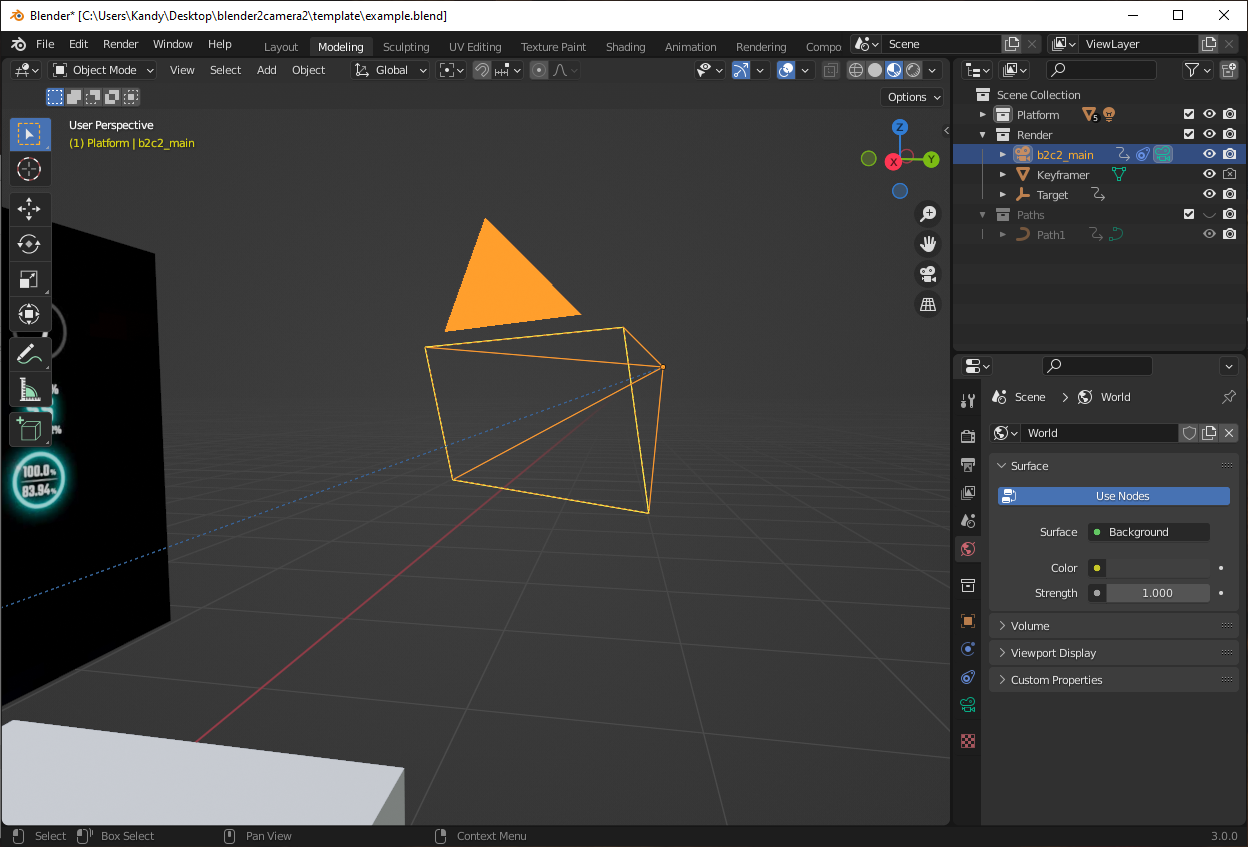
# Render → b2c2_main
This is the camera object. The export script records the position, rotation, and field-of-view of every camera object on every frame, and uses this information to write the Camera2 movement scripts.
DANGER
Do NOT delete or rename the b2c2_main camera object. The export script requires at LEAST one camera object with b2c2_ prefix in the name.
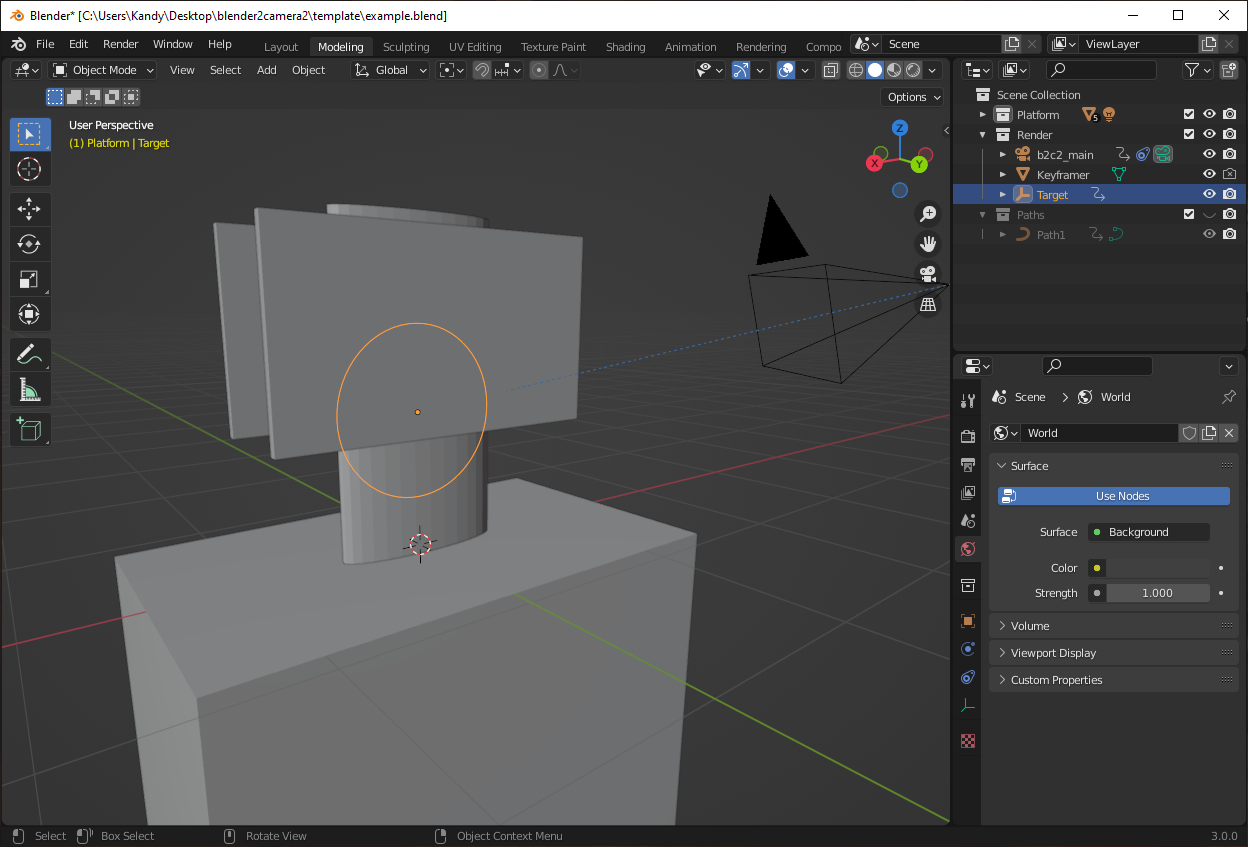
# Render → Target
This is the camera Target object. The template has been configured so that the camera is always looking at the target.
You will be manipulating this object many times.
DANGER
Do NOT delete or rename the Target camera object. Otherwise you will have to point the camera manually.
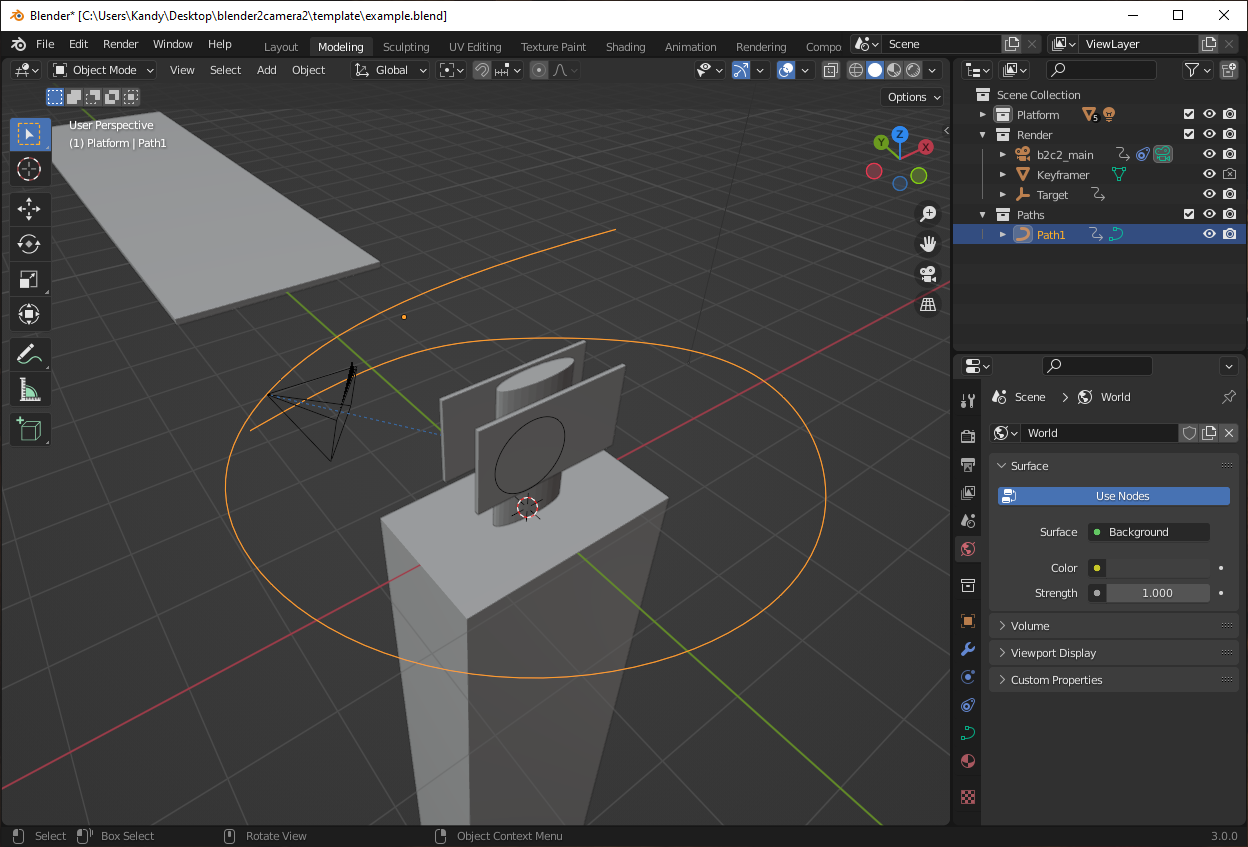
# Paths
This collection will contain your individual camera paths.
REMEMBER TO SAVE AND MAKE BACKUPS!
Blender likes to crash often, so remember to save (press Ctrl + S) after every major change. Also, remember to make regular backups of your work.
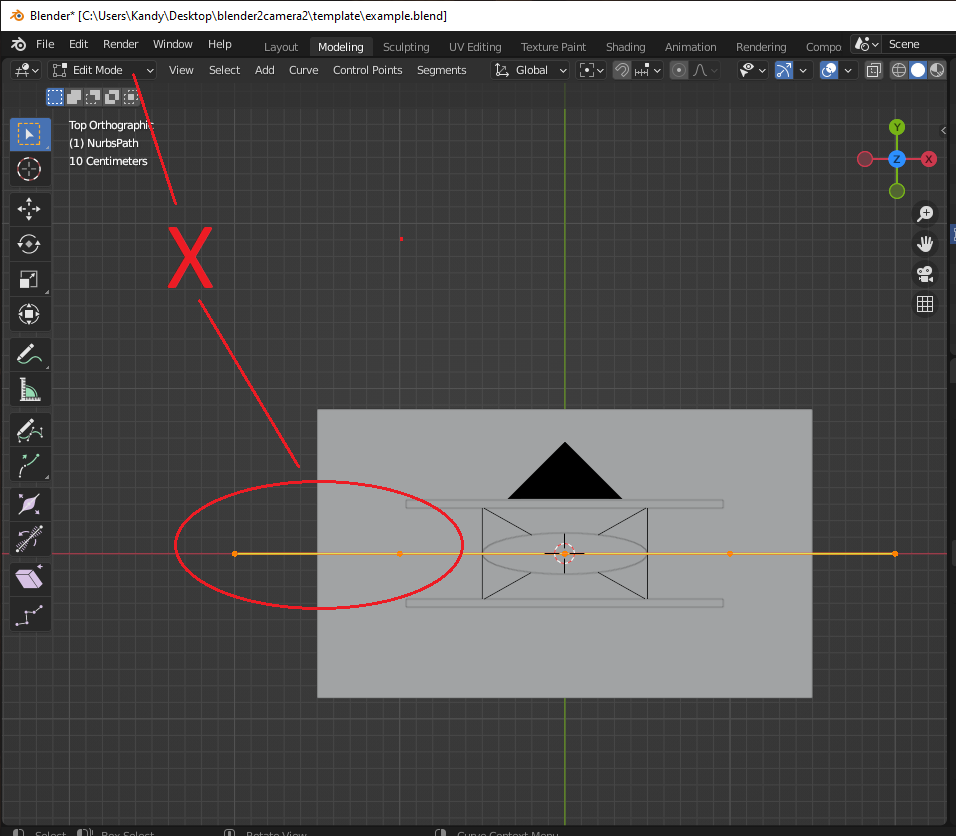
# Create a Simple Camera Path
# Step 1: Remove existing path
- Verify that the Modeling workspace is in Object Mode.
- Remove the template's existing camera path by left-clicking and pressing X.
# Step 2: Create new path
- Verify that you are in the Modeling workspace.
- Verify that you are in Object Mode (look at upper left of the window).
- If you are in Edit Mode, hit Tab to switch to Object Mode.
- Verify that the
Pathsgroup is selected in the Scene Collection tab (on the right side of the Blender window). - If you want, flip the view to top-down by left-clicking the blue Z on the X/Y/Z tree in the upper right of the workspace window.
- Press Shift + A.
- Select Curve → Path from the menu.
# Step 2.1: Possible troubles
# My path has dots in it and looks weird.
Verify that you are in Object Mode, not Edit Mode, before creating the path.
# The new path did not appear.
Use your mouse wheel to zoom out a bit further.
If you still cannot find the new path then:
- Select the new path in the Scene Collection tab.
- Press Numpad .. The camera will zoom to the newly created path.
# Step 3: Rename the path
In the Scene Collection tab, select the new path, and then press F2.
Give the path a descriptive name.
WARNING
Use a number at the beginning of the path name, so that it is easily sorted later.
# Step 4: Position the path
Click on the path and press G. Drag the path to a spot close to where you want it to be.
TIP
Remember you can change the perspective by clicking the X/Y/Z tree in the upper right corner.
If you want to move the path along an axis, press G + X (for X axis) G + Y (for Y axis), or G + Z (for Z axis).
You can rotate the path by selecting it and pressing R.
In my example I have placed this camera path directly in front of the player.
# Step 5: Fine-tune the path position
Now it is time to make some fine changes.
Remember to use the grab / move, rotate, and scale functions to get the path exactly where you want it to be.
DON'T FORGET
Save your work. (press Ctrl + S)
# Moving the Camera
With the path created, it is now time to configure the camera movement.
# Step 1: Set the path to the camera constraint
- Verify that you are in the Modeling workspace.
- In the Scene Collection tab, expand
Renderand then selectb2c2_main. - In the options list below, click Object Constraint Properties.
- Near the Target field, click the Eyedropper icon.
- Click the newly created path (
Path001-simplein this example). - The camera object should snap to the path.
# Step 2: Position the camera at the beginning of the path
WARNING
Camera Offset values should be between 0 (zero) and -100 (negative one hundred).
Where the path "begins" and "ends" is up to you. Remember that this is your creative expression and you get to decide how it looks.
For this example, the camera will "begin" far away from the player and "end" close to the player.
- Left-click and hold the Offset field.
- Drag the mouse side to side and see how the camera moves.
- To see the camera, press Number Pad 0.
# Step 3: Create the first keyframe
- When you are happy with the position of the camera, click the Animate property button next to the Offset field.
- Switch to the Layout workspace.
- Note the newly created keyframe.
TIP
A keyframe records the value of a parameter at a specific point in time. Blender uses this information to create animations by automatically calculating values between two or more keyframes.
# Step 4: Create the second keyframe
- Verify that you are in the Layout workspace.
- Use the keyframe timeline editor (Blender calls this the Dope Sheet) to set the frame at which the camera will stop movement.
- Move back to the Modeling workspace.
- Set the new camera Offset value.
- The template has auto-keyframing enabled, so the new keyframe will be created automatically when the Offset value is changed.
TIP
This tutorial was written using B2C2 v1.0. In the video below I chose to stop on frame 240. Since framerate is set to 120, this means the camera will move from start to end over 2 seconds.
For B2C2 v1.1 (or newer), the end keyframe should be 120.
# Step 5: Play the scene
- Set your current frame to
1, either by dragging the frame marker, or by pressing Shift + ←. - Click the Play button above the keyframe editor / Dope Sheet.
- The camera will animate in real time.
Congratulations on creating your first camera path!
DON'T FORGET
Save your work. (press Ctrl + S)
# Animating the Camera
Our camera is moving, but the simple transition looks boring. We can change this using the Animation workspace.
# Step 1: Open the Animation workspace
- At the top of the Blender window, click Animation.
- Under the Scene Collection tab, verify that the
b2c2_mainentity is selected. - Expand the
b2c2_mainanimation curve list in the animation curve editor.
# Step 2: Position the animation curve window
The animation curve can be seen, but it is very small. We can fix that.
Zooming and panning work the same way in the animation curve editor.
- Use mouse wheel to zoom.
- Use Shift + Middle Mouse click to pan.
To expand the animation curve length, use Ctrl + Middle Mouse click.
# Step 3: Edit the animation curve
Grabbing / moving, rotating, scaling work the same in the animation curve editor.
- Click on a keyframe and then press G to grab and move it.
- Click on a keyframe and then press R to rotate the Bezier curve handles.
- Click on a keyframe and then press S to scale the Bezier curve handles.
I want to set the camera so that it starts out fast, slows down in the middle, and then speeds up as it approaches the player.
This can be done by changing the shape of the Bezier animation curve, which represents the Offset of the camera.
TIP
- For slow movement, make the Bezier curve flat.
- For fast movement, make the Bezier curve tall.
Use the Play button to quickly preview the animation and make changes.
DON'T FORGET
Save your work. (press Ctrl + S)
# Create a Complex Camera Path
The simple camera path is working but it still looks a bit boring.
Follow these steps to make something more interesting.
# Step 1: Create another new path
Add another path to your scene.
If you forgot how to do this then review the steps for creating a new path.
# Step 2: Hide the first path
In the Scene Collection tab, click the 👁 (eye icon) next to the first path. This will hide the path from view, so it does not interfere with the new path.
# Step 3: Rename the path
- In the Scene Collection tab, select the new path.
- Press F2.
- Give the path a descriptive name.
# Step 4: Change to Edit Mode
- Flip the camera to top-down view by clicking the blue Z on the X / Y / Z gizmo.
- With the new path selected, press Tab.
- Verify that the workspace has changed to Edit Mode (look in the upper left corner of the Blender window).
# Step 5: Move and manipulate the path
- Review Working with Complex Paths.
- Press Tab to move between Edit Mode and Object Mode.
- Use Edit Mode to change the path control points.
- Use Object Mode to move the entire path.
- Use all the commands you have learned so far to create a spiral path around the platform object.
- When you are done, review Setting the Pivot Point.
DON'T FORGET
Save your work. (press Ctrl + S)
# Moving the Camera Between Paths
Unless you plan to make one large path for your entire video, you must configure the camera to move between paths.
Here is a demo that shows the camera changing angles often. This is done by forcing the camera to move between paths.
# Step 1: Open the camera Object Constraint Properties
- Switch to the Modeling workspace.
- Verify that the workspace is in Object Mode.
- In the Scene Collection tab (on the right side), select the camera
b2c2_main. - Open the Object Constraint Properties tab.
# Step 2: Add a new "Follow Path" Object Constraint
- In the Object Constraint Properties tab, left-click Add Object Constraint.
- Select Follow Path from the list.
# Step 3: Change the order of the Object Constraint items
- The Track To item must always be in the last position.
- Left-click + hold the dots on the right side of the new Follow Path item, and then drag up until the Track To item moves to the bottom of the list.
# Step 4: Set the path to the camera constraint
- Near the Target field, click the Eyedropper icon.
- Click the newly created path (
Path002-complexin this example).
The camera object should snap to the path, but it looks strange. This will be fixed in the later steps.
TIP
Name the camera constraint objects, if you have not already done so.
# Step 5: Set the Path001 camera "Influence" on the first keyframe
- Switch to the Layout workspace.
- Use the ↓ arrow key to move the current frame to the first keyframe in the keyframe editor. (In this example, this is keyframe
1). - Expand the
Follow Path001constraint. - Set the Influence field to
1.000. - Click the Animate property button to set the keyframe value.
# Step 6: Set the Path001 camera "Influence" on the second keyframe
TIP
The next several steps depend on the version of B2C2 you have.
- Use the ↑ arrow key to move to the next keyframe (
240for B2C2 v1.0, or120for B2C2 v1.1 and newer). - In the
Follow Path001constraint, set the Influence field to1.000. - Click the Animate property button to set the keyframe value.
# Step 7: Set the Path002 camera "Influence" on the second keyframe
- If you are following the example, the current keyframe should be
240for B2C2 v1.0, or120for B2C2 v1.1 (and newer). - Expand the
Follow Path002constraint. - Set the Influence field to
0.000. - Click the Animate property button to set the keyframe value.
# Step 8: Set the Path002 camera "Influence" on the third keyframe
- Press the → arrow key once to move forward by one frame.
- The current keyframe should now be
241for B2C2 v1.0, or121for B2C2 v1.1 (and newer). - Under the
Follow Path002constraint, set the Influence field to1.000.
TIP
If the field does not turn yellow automatically, click the Animate property button to set the keyframe value.
# Step 9: Set the Path001 camera "Influence" on the third keyframe
- The current keyframe should now be
241for B2C2 v1.0, or121for B2C2 v1.1 (and newer). - Under the
Follow Path001constraint, set the Influence field to0.000. - If the field does not turn yellow automatically, click the Animate property button to set the keyframe value.
# Step 10: Verify that the camera now moves between the two paths.
- In the Scene Collection tab, under Paths, set
Path001-simpleto visible by clicking the eye icon. - Under
Render, select the camerab2c2_main. - Drag the current frame marker and watch the camera move between the two paths.
# Next Steps
- Animate the camera along the new path.
- Refer to Moving the Camera for help.
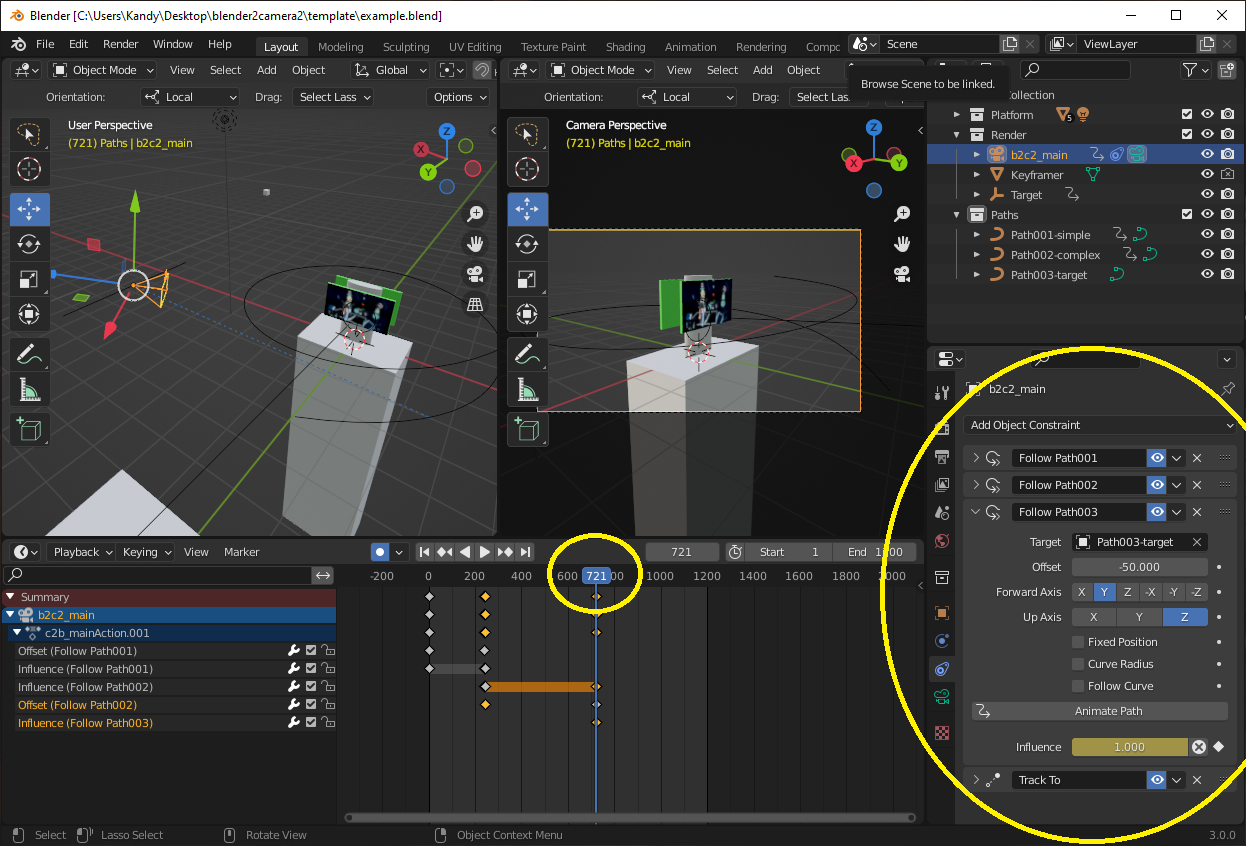
# Fast-forward: Setting the new camera "Offset" values
I set the end keyframe on frame 720.
(If I were using B2C2 v1.1 or newer, the end keyframe would be on frame 360.)
# Fast-forward: Setting animation curves
DON'T FORGET
Save your work. (press Ctrl + S)
# Moving the Target
In template.blend the camera is always looking at the target. You can animate the target so the camera view looks more dynamic. Here is an example from the LUVORATORRRRRY! video:
You can see how the camera follows the target by moving the Target object around in Blender:
# Before: Create a third new path
- Create a new simple path or complex path
- Configure the camera so that it moves to the new path
Here is the path that I created for this step.
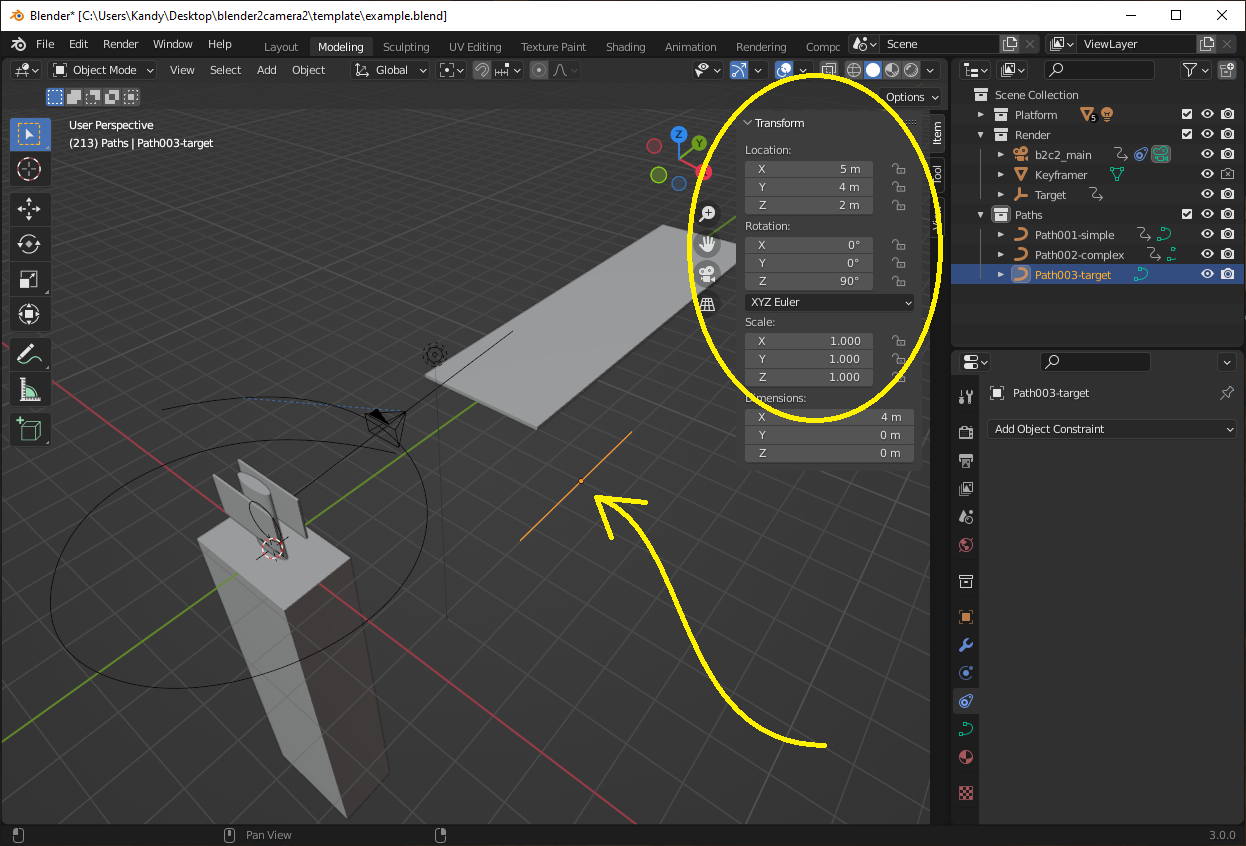
Here are the path parameters.
- The camera offset is
-50. - The camera jumps to
Path003on frame721. (This would be361for B2C2 v1.1 and newer.)
# Step 1: Add a keyframe before moving the target
WARNING
Do not begin moving the target yet! You must add a keyframe BEFORE moving the target, or it will make the previous camera views incorrect.
- Open the Layout workspace.
- Move the current frame index to the frame where you want to the target to begin movement. (In the example this is frame
721. It would be361for B2C2 v1.1 and newer.) - If you are not on keyframe
1: press ← arrow on the keyboard to step back one frame. - In the Scene Collection tab, under
Render, select theTargetobject. - Move the mouse cursor to the User Perspective window, but do NOT click.
- Press the I key (for insert keyframe).
- Select Location & Rotation.
# Step 2: Move the target to the starting position
# Moving the Target
- Press the → arrow key to move forward by one keyframe. (In this example, the current keyframe should now be
721. It would be361for B2C2 v1.1 and newer.) - Use grab / move command (press G) to move the target to a new position.
- Remember to use X, Y, and Z keys to snap to an axis.
You can switch to the Modeling workspace if you wish.
# Creating the Keyframe
- If auto-keyframing is enabled, the new keyframe will be created automatically.
- If the new keyframe does not appear, press the I key to insert the new Location & Rotation keyframe.
# Step 3: Choose the ending keyframe for the target
In the keyframe editor, drag the current keyframe index to where you want the target to stop moving.
In this example I set the target to stop moving at frame 840. (This would be 420 for B2C2 v1.1 and newer.)
# Step 4: Move the target to the ending position
This is just like Step 2, but for the target ending position.
# Step 5: Verify that the target moves correctly
- Drag the current keyframe index to preview the target movement.
- Press Spacebar to see the scene play in real-time.
DON'T FORGET
Save your work. (press Ctrl + S)
# Editing the Animation Curves
Just like with the camera Offset values, Position & Rotation values for Target can be edited in the Animation workspace.
This way you can create smooth or complex movements, beyond simple linear or Bezier movements.
# Step 1: Open the Animation workspace
- In the Scene Collection tab, under
Render, select theTargetobject. - Click the Animation workspace tab at the top of the screen.
# Step 2: Disable unused values
- The X / Y / Z Scale values are never used, so it is best to hide them.
- For this example, the target only moved in the Y direction. So turn off the X and Z Location curves.
# Step 3: Edit the animation curve
- It is okay to make several attempts. Remember to save often.
- If you make a mistake, hit Ctrl + Z to undo.
DON'T FORGET
Save your work. (press Ctrl + S)
# Exporting Camera Paths from Blender
After you have created your camera paths, it will be time to export the data from Blender. This data will be exported in a format that Beat Saber and the Camera2 plugin can understand.
# Step 1: Set the movement script duration
TIP
The next step depends on the version of B2C2 you have.
- The length of the movement script is determined by the number of frames in the Blender project.
- You must adjust this number so the movement script is not too short.
- A high number of frames is OK, but the movement script file size will be large.
- The B2C2 v1.0 template runs at
120frames per second. - The B2C2 v1.1 and newer templates run at
60frames per second.
Set the maximum number of frames in the keyframe editor / Dope Sheet view.
# Step 2: Open the Scripting workspace
In the workspace tabs at the top of the screen, find Scripting and left-click.
TIP
If the tab is not shown, hold middle-mouse click and drag the tabs until the Scripting tab appears.
# Step 3: Open the export script
- At the top of the Scripting workspace, click Open.
- Find the
b2c2_export.pyscript file in theblender2camera2download package. - Click Open Text.
# Step 4: Run the export script
- Click the Play button near the top of the workspace.
- In the pop-up box, find a place to save your movement script.
- Click Export.
- Wait for Blender to finish the export process.
TIP
Since we made such a short script I recommend enabling the "Loop" option while saving the file, like I did in the video below. This script will loop continuously as the map plays. You should turn this option off for scripts that run for the length of the entire map.
# Step 5: Check the exported movement script
- Navigate to the save folder.
- Open the script in a text editor.
If it looks like a Camera2 movement script, then you are ready for the next steps.
DON'T FORGET
Save your work. (press Ctrl + S)
# Configure Beat Saber and Camera2
Now it is time to open Beat Saber and configure the Camera2 plugin.
I assume that you have already installed Camera2 and all the required plugins. If you need help with this step, refer to the Camera2 documentation (opens new window).
# Step 1: Open Beat Saber
This is always my favorite part.
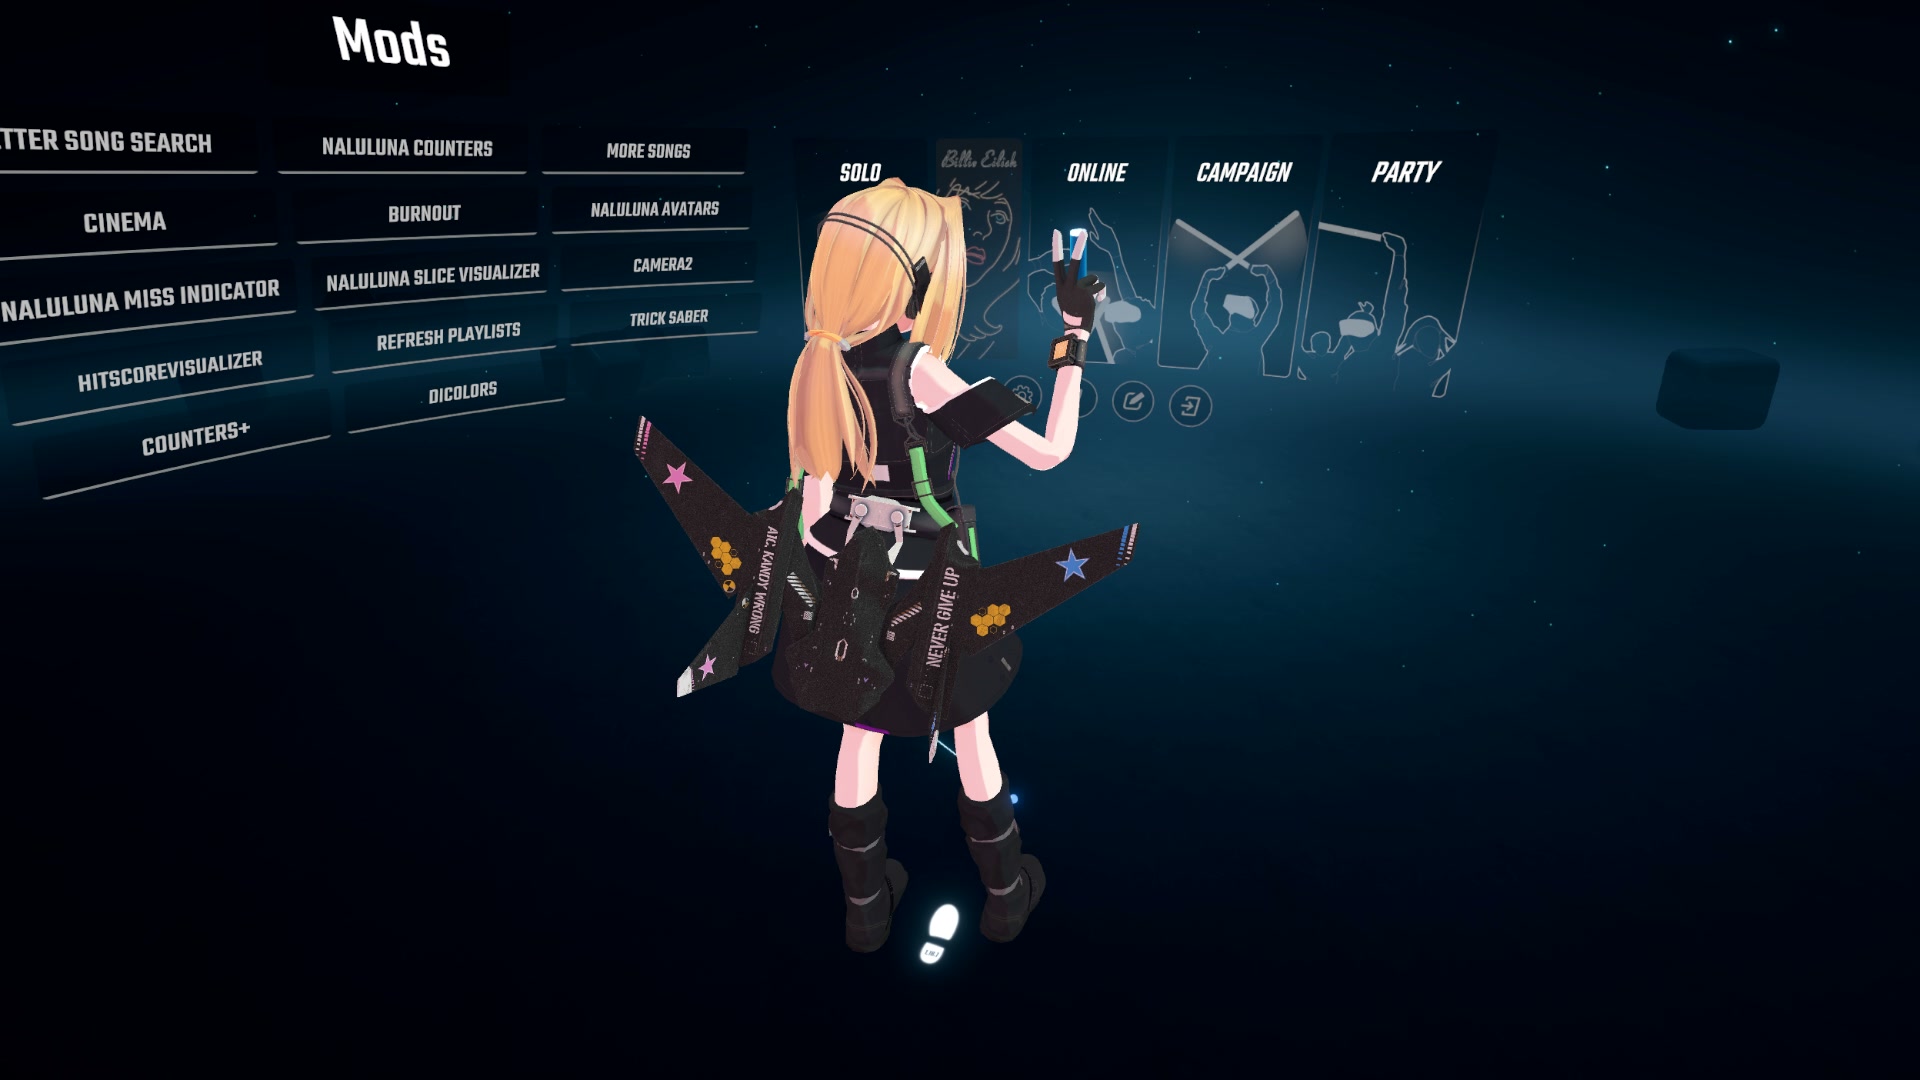
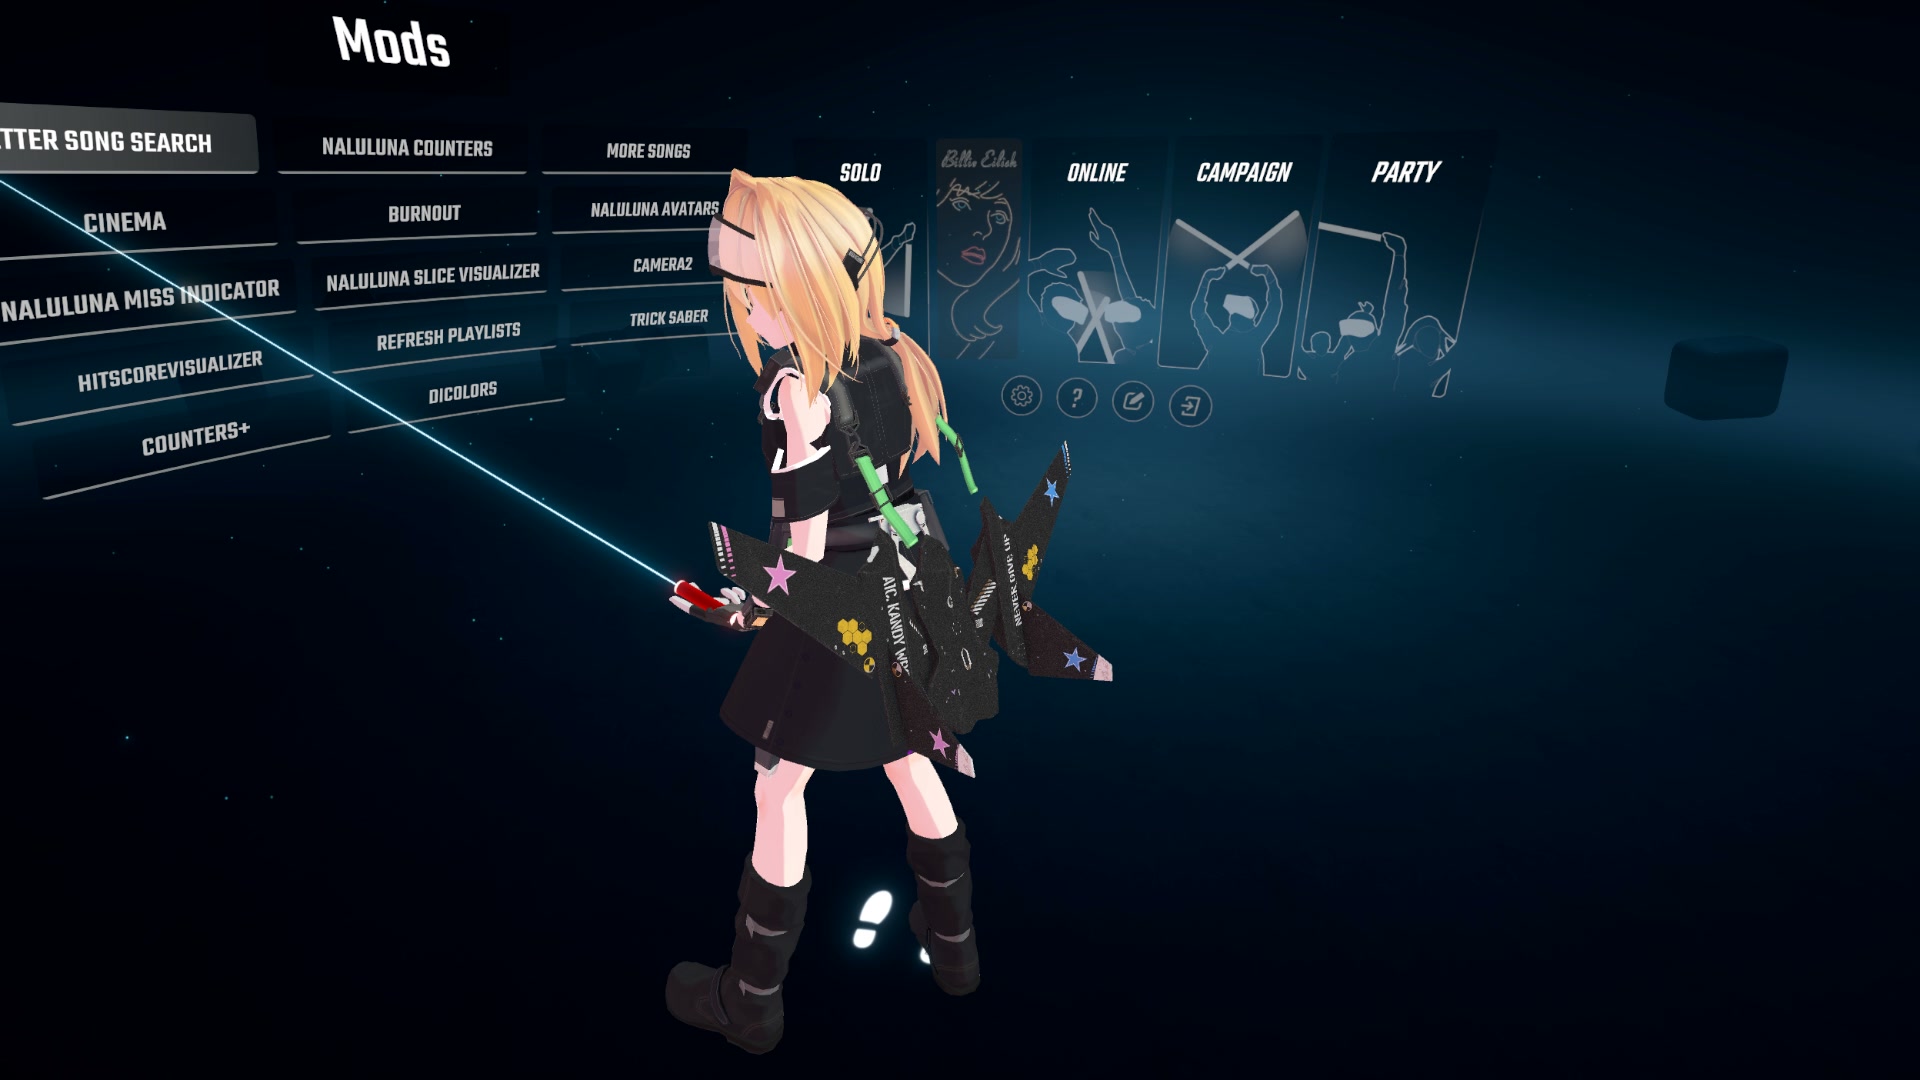
# Step 2: Open the Camera2 settings
Just click the button under your Mod list or menu.

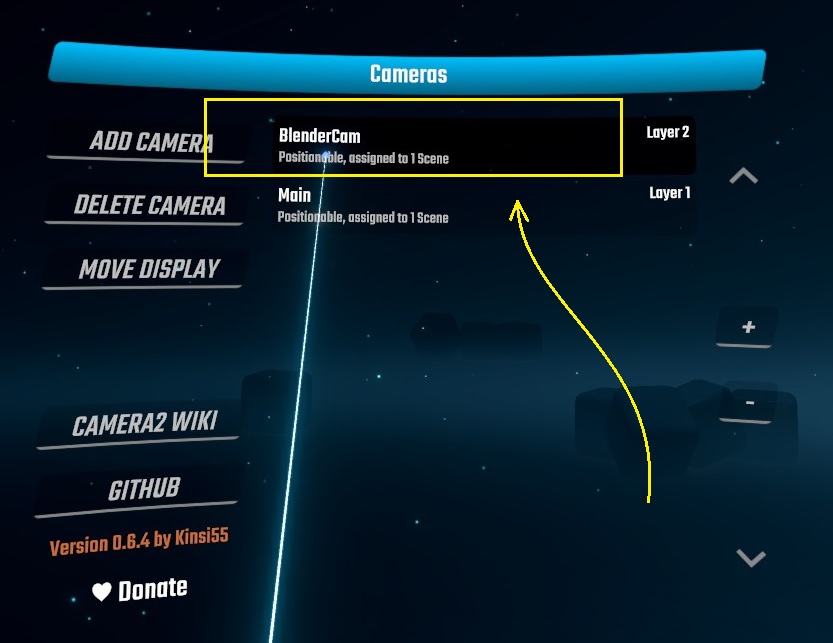
# Step 3: Create a dedicated camera
Create a separate, dedicated camera for running movement scripts while playing a map. In the example below, I named this camera BlenderCam.

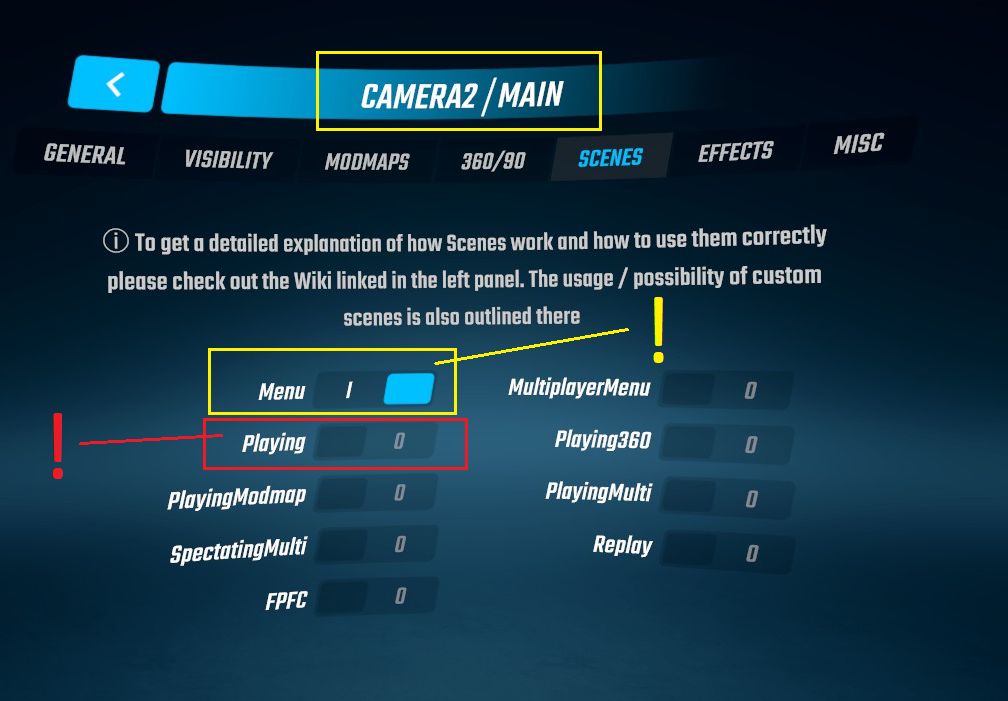
# Step 4: (Optional) Disable "Playing" in the main camera
This is my preference, you are free to ignore this if you already have configured your other cameras.
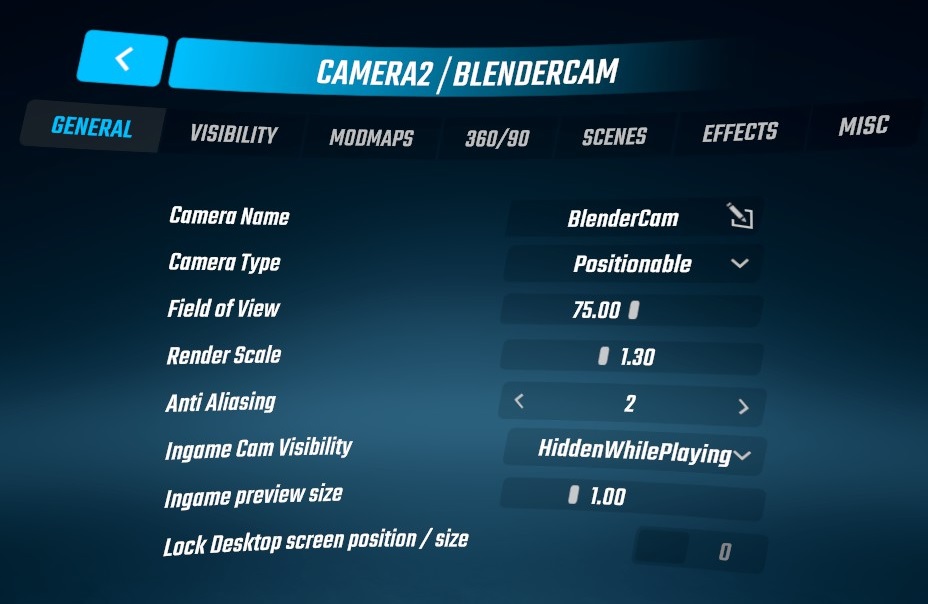
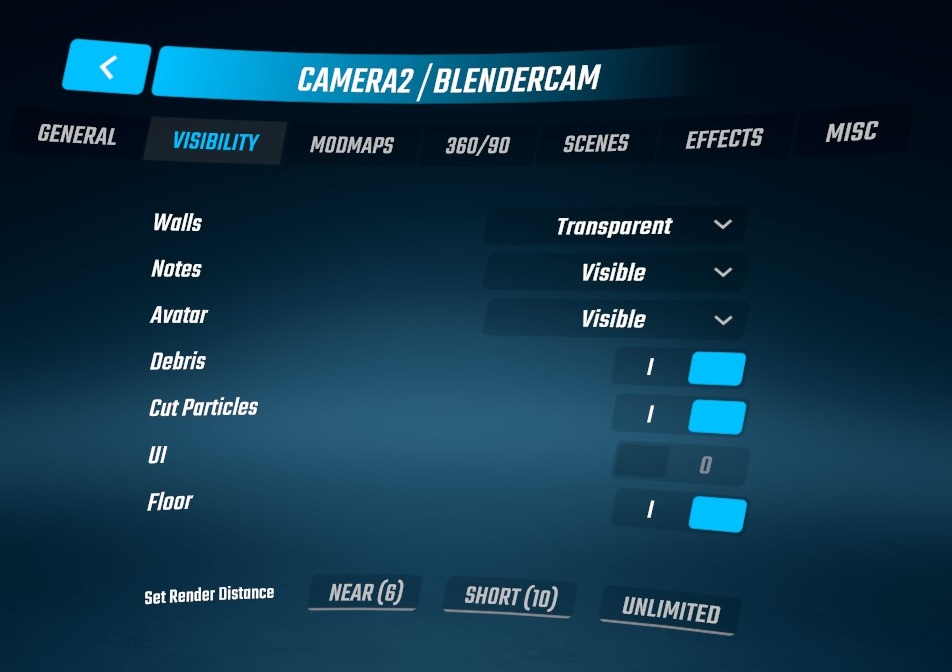
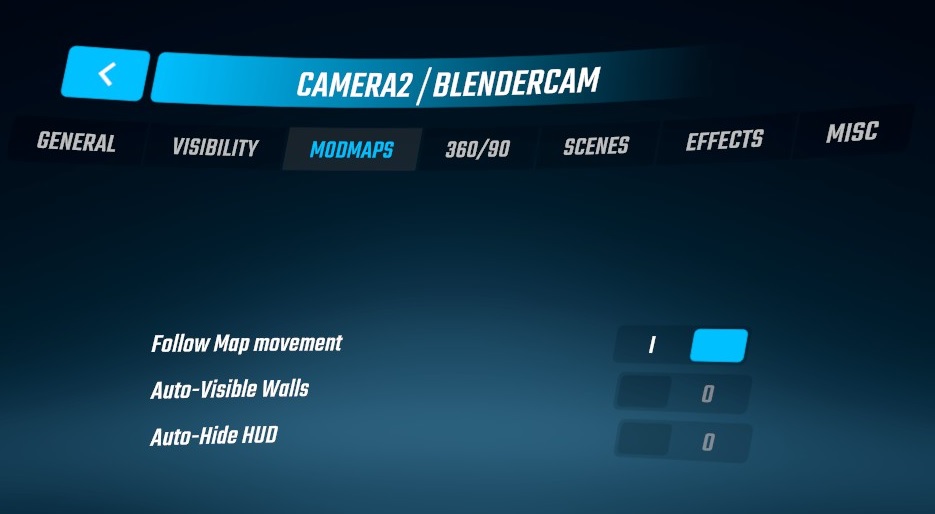
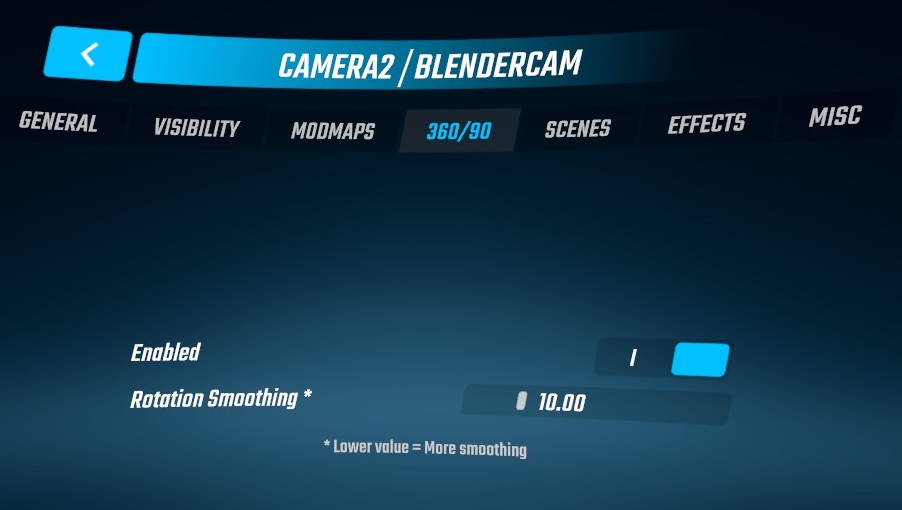
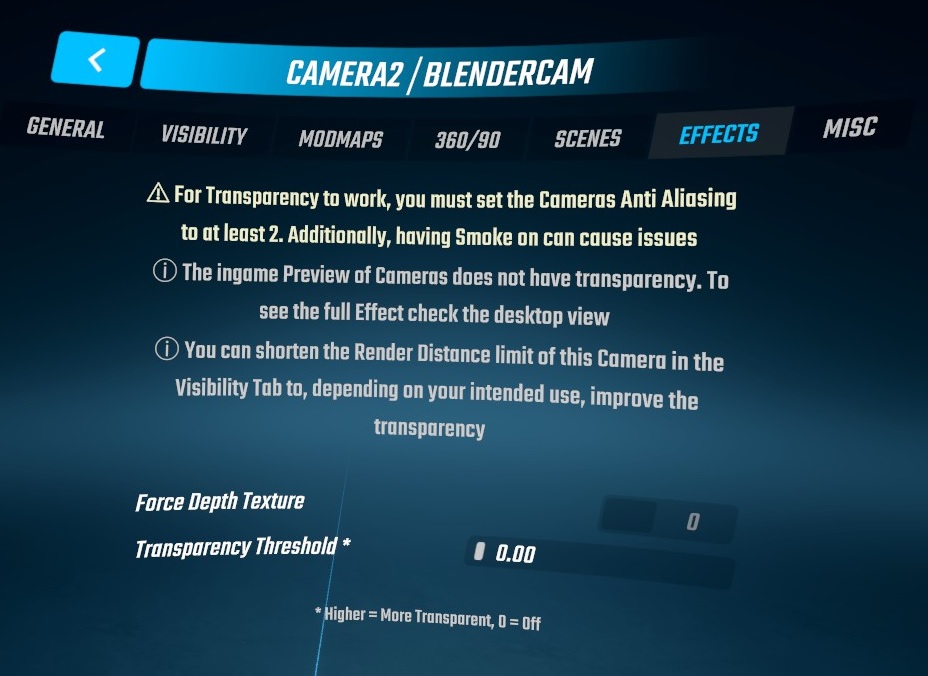
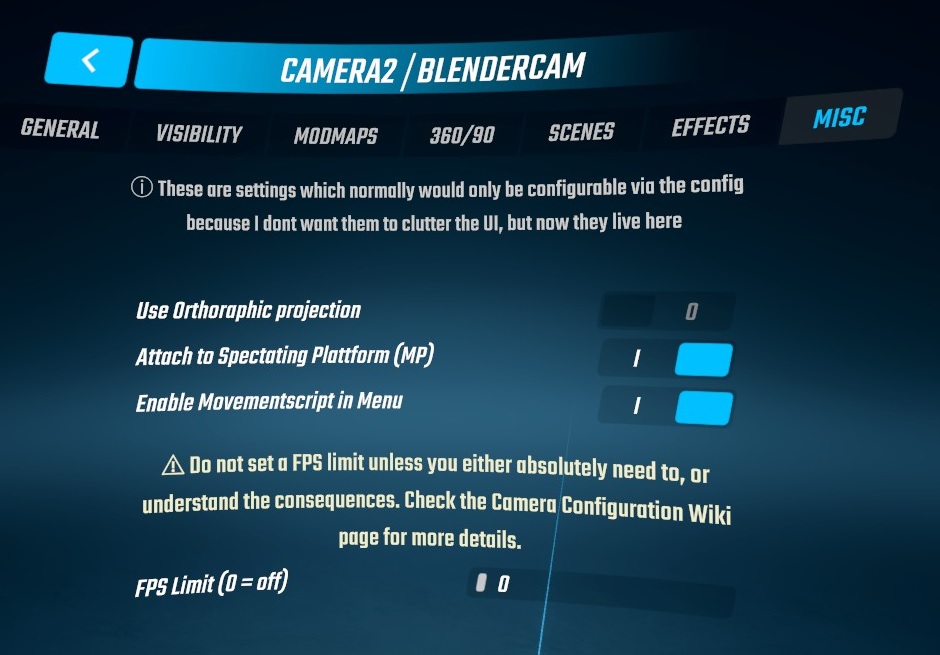
# Step 5: Configure the new BlenderCam
These are my settings. You may modify these as you wish.
TIP
If this is your first movement script, I recommend using my settings first and then changing them later.
# General
# Visibility
# Mod Maps
# 360/90
# Scenes

# Effects
# Misc
# Step 6: Close Beat Saber
Leave your headset powered up, you will be back in the game soon.
# Step 7: Install the movement script
- Review the Camera2 documentation (opens new window).
- Open the folder that contains the movement script that was exported from Blender.
- Open the Beat Saber installation folder.
Your installation folder might be at:
C:\Program Files (x86)\Steam\steamapps\common\Beat Saber
Copy and paste the movement script into:
C:\Program Files (x86)\Steam\steamapps\common\Beat Saber\UserData\Camera2\MovementScripts
# Step 8: Connect the movement script to the "BlenderCam" camera
Navigate to:
C:\Program Files (x86)\Steam\steamapps\common\Beat Saber\UserData\Camera2\Cameras
- Open
BlenderCam.jsonin a text editor. - Scroll down to
MovementScript. - Under
scriptList, add the name of your movement script. - Save the file.
Your MovementScript → scriptList configuration should look like this:
  "MovementScript": {
    "scriptList": [
      "example_b2c2_main"
    ],
  }
# Step 9: Restart Beat Saber
You know how to do this.
# Step 10: (Optional) Preview the movement script in the menu.
- Open the Camera2 options menu again.
- Verify that the
BlenderCamis selected. - Under the Misc tab, click the Enable Movementscript in Menu option.
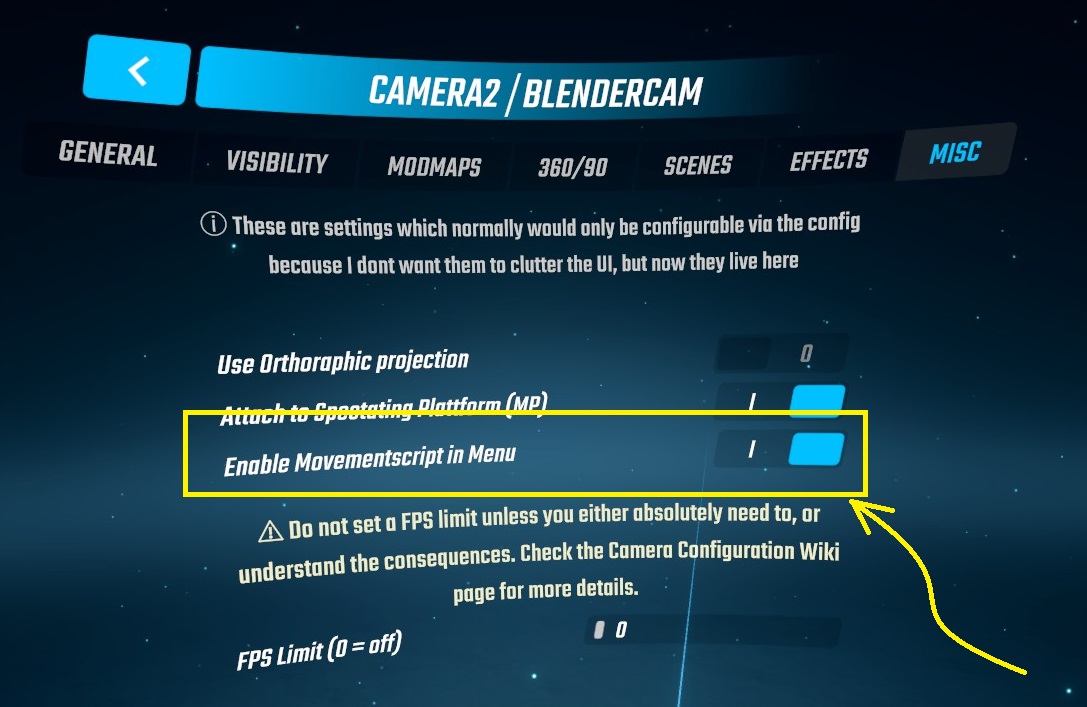
If you have done everything correctly, then you should see the camera movement script play in the game menu.
# Step 11: Play the movement script in the map!
Finally, try your new movement script while playing a map. Pick any map from the play menu and start playing.
The demo video below shows how the movement script will loop continuously as I play.
# Next Steps
If you made it all the way to the end of this guide, good job! It took a lot of work on your part to get this far. Not many people have that kind of patience!
Try doing these things next:
- Review the included
example.blendandexample-complex.blendfiles - Review the
release.blendfile, and see all the paths that I made for the LUVORATORRRRRY! video - Read more about Using Blender
- Read about Advanced Techniques